
Step 0: Before you start
You need all of these on your Binance account before you can create a working key:
- Identity verification (KYC) completed. Binance will not let you create API keys without it.
- Two-factor authentication (2FA) turned on (authenticator app or passkey). You will need it to confirm the new key.
- A USDⓈ-M Futures account opened. On Binance go to Futures → USDⓈ-M Futures → Open Account and complete the short questionnaire/quiz Binance shows you. Binance's guide.
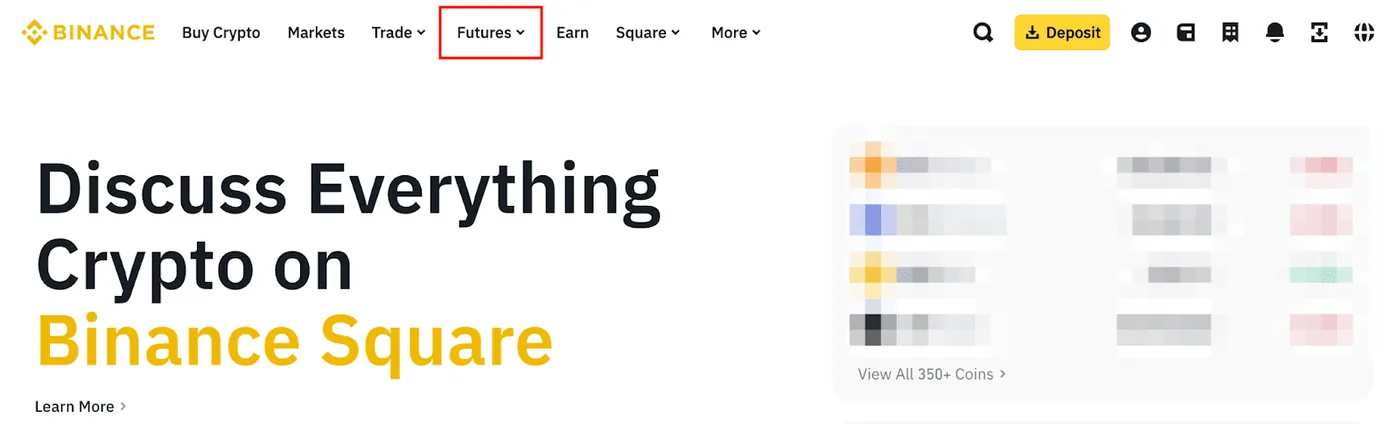
- Your ByteBoom account and an active plan. The BinanceSetup button in ByteBoom Settings unlocks once your plan is active.
Step 1: Get the ByteBoom server IP
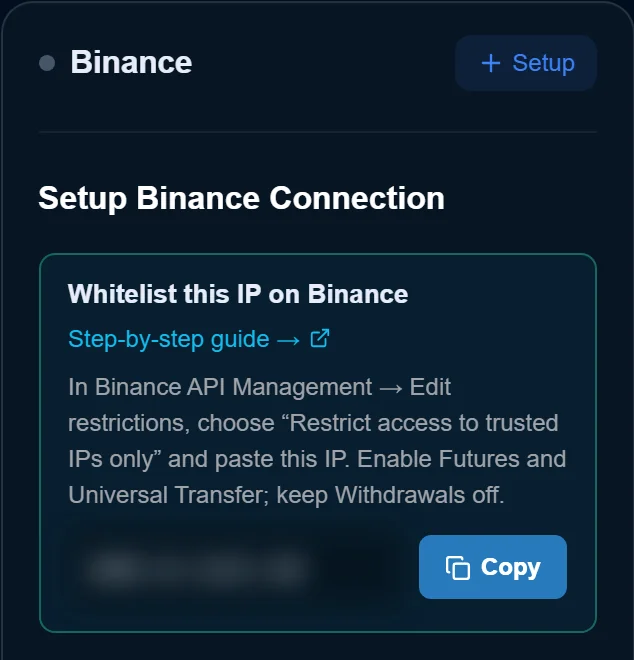
Your key will only work from ByteBoom's server, so you need its IP address first. For security, ByteBoom only shows this IP to logged-in members. It is not published on this page.
- Log in at user.byteboom.ai.
- Open the menu under your name (top right) → Settings. You can also go straight to Settings once you're logged in.
- Under Connected Exchanges, click Setup next to Binance (or Update if it's already connected).
- In the Whitelist this IP on Binance box, click Copy. Keep this tab open, because you'll come back to paste your keys in step 7.
Step 2: Open API Management on Binance
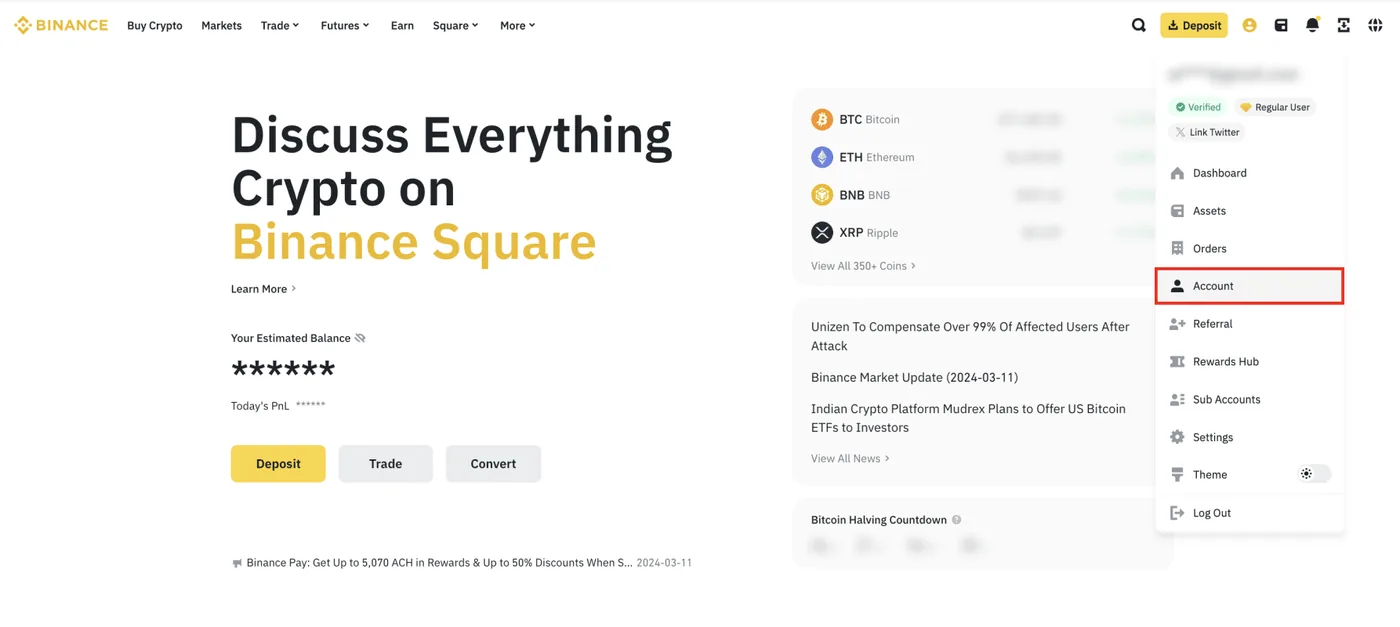
On binance.com (a desktop browser is easiest), click the profile icon (top right) → Account.
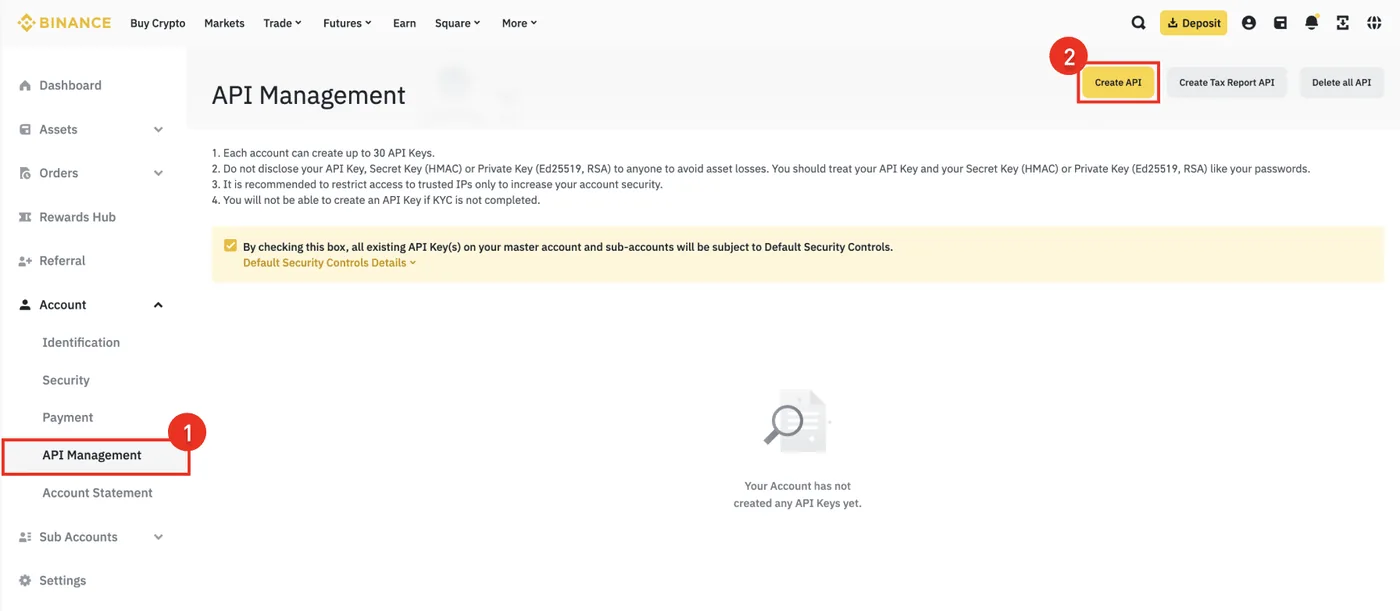
In the left menu choose API Management, then click Create API.
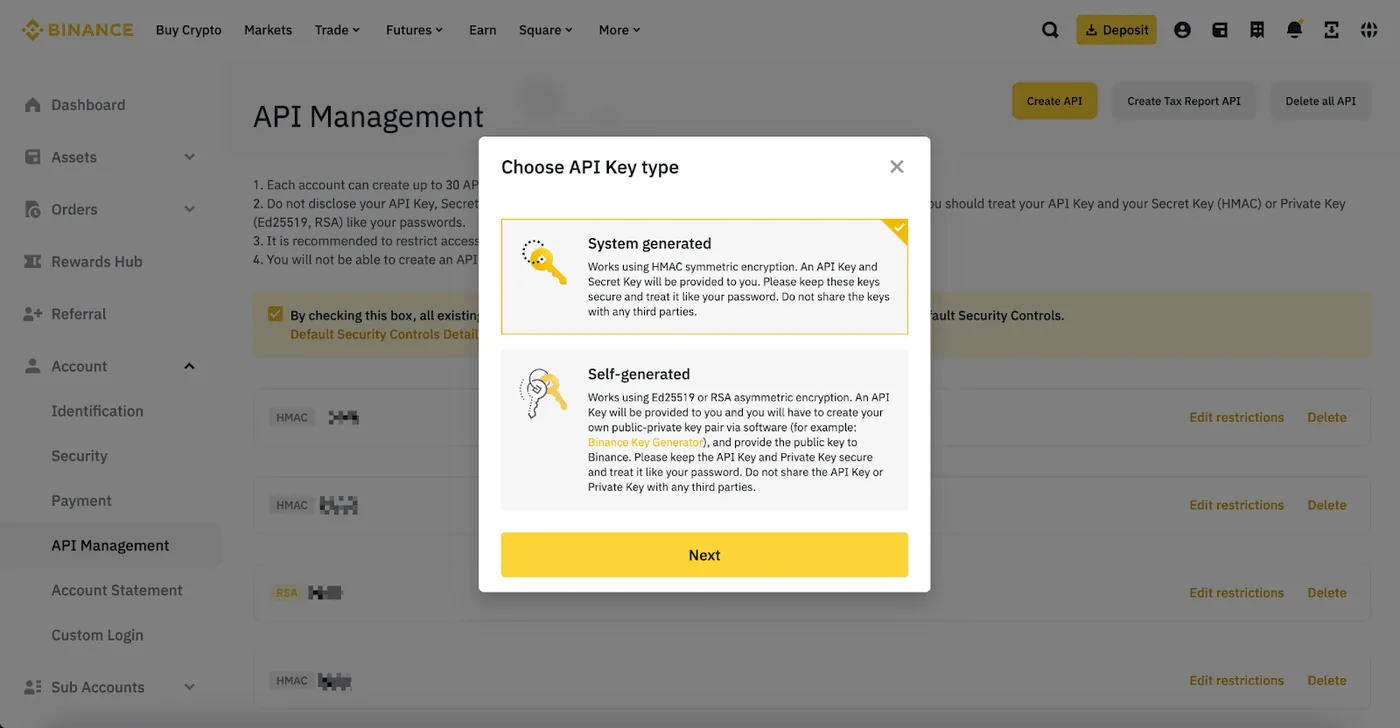
Step 3: Create a System-generated key
Choose System generated and click Next.
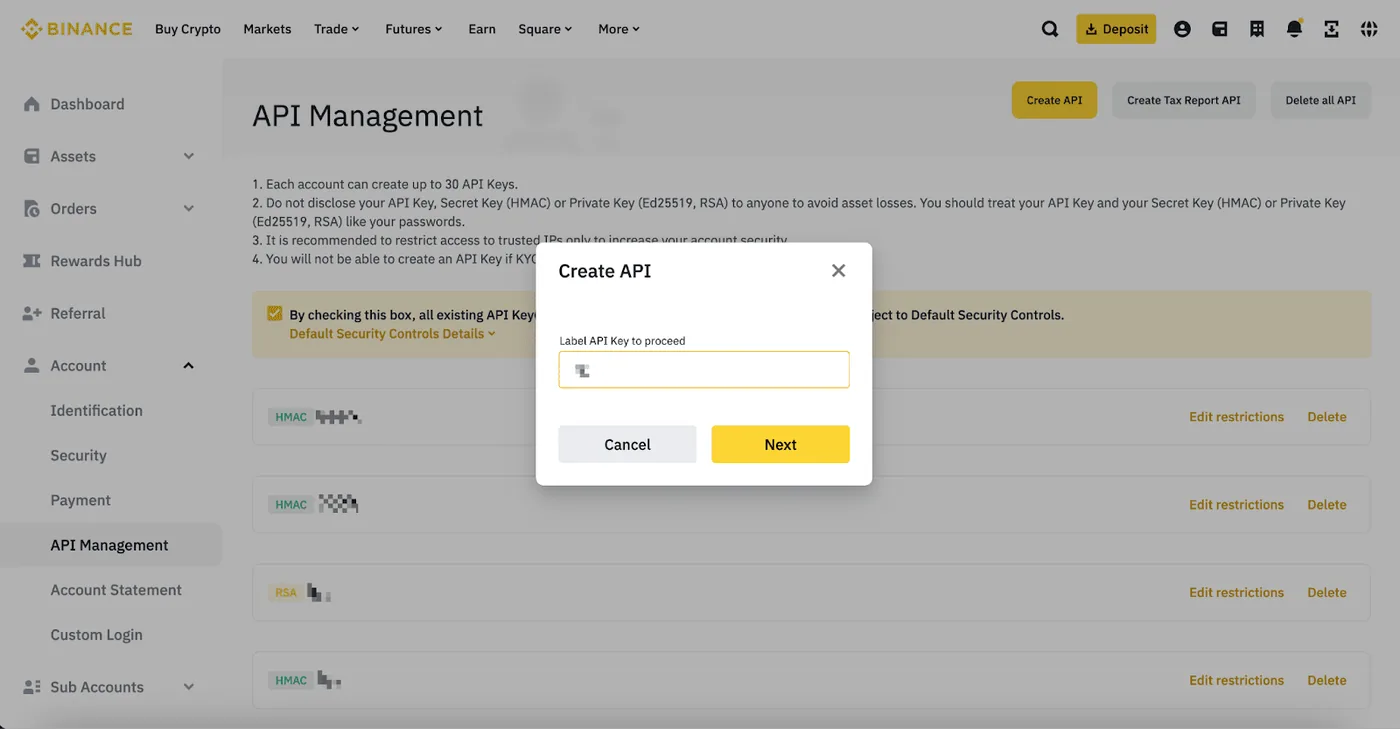
Enter a label you'll recognise, for example ByteBoom, and click Next.
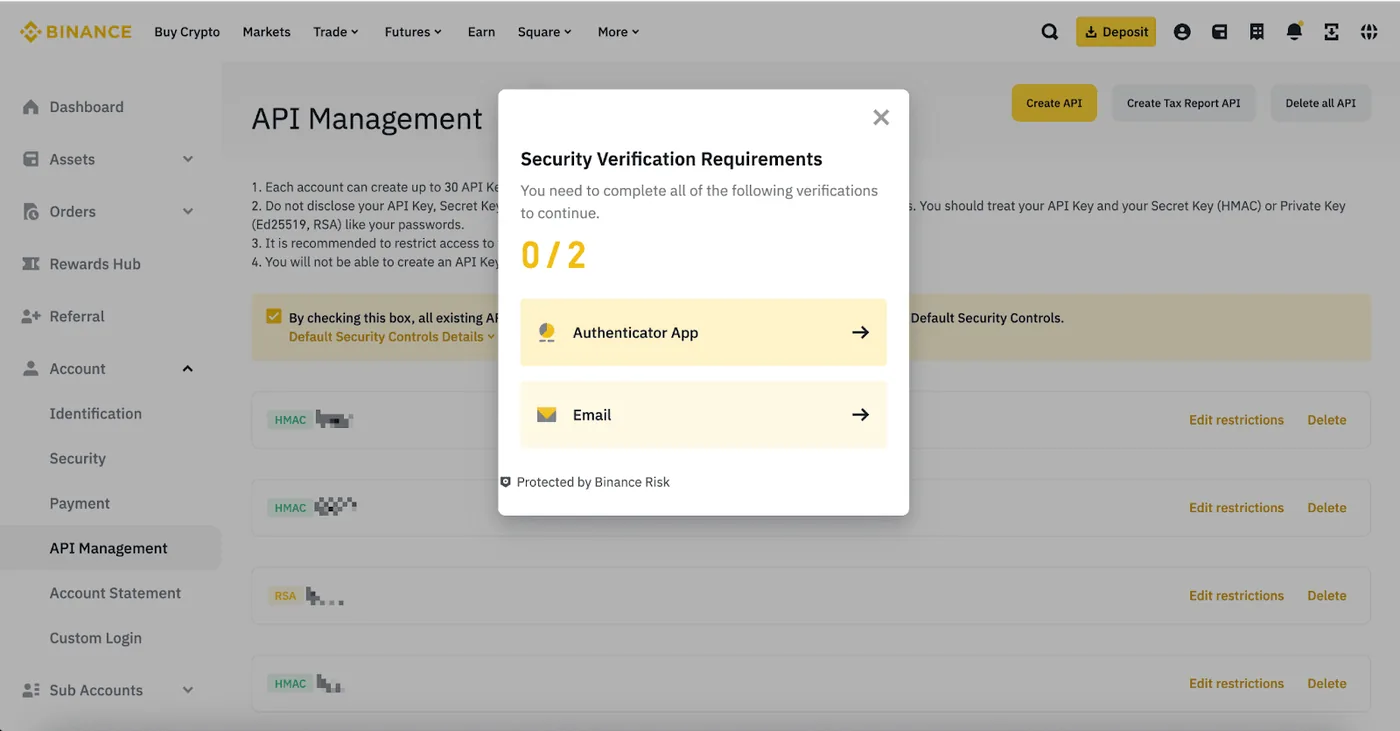
Complete the security verification (authenticator app, email and/or passkey).
Step 4: Copy your API Key and Secret Key right away
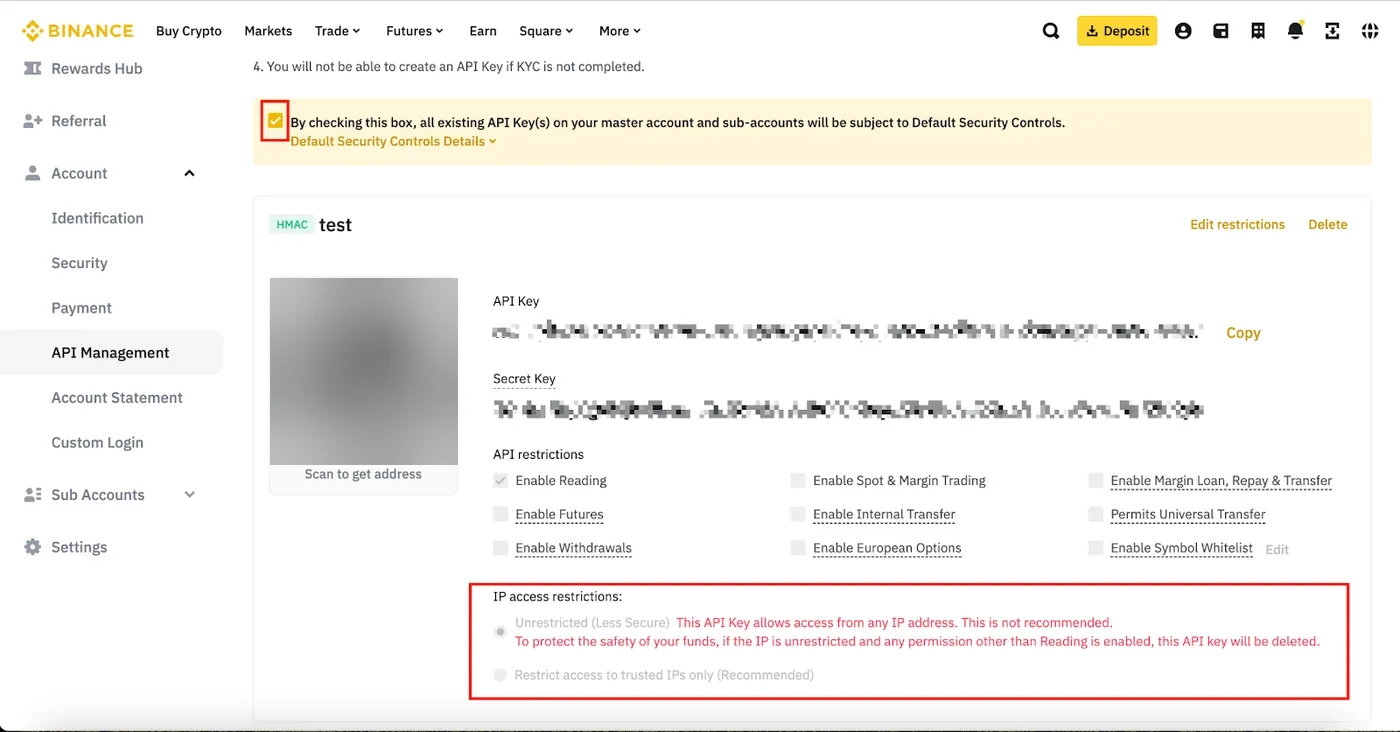
Your new key appears with an API Key and a Secret Key. Copy both now and keep them somewhere safe until step 7 (a password manager is ideal).
Step 5: Set the IP restriction and permissions
On the key, click Edit restrictions.
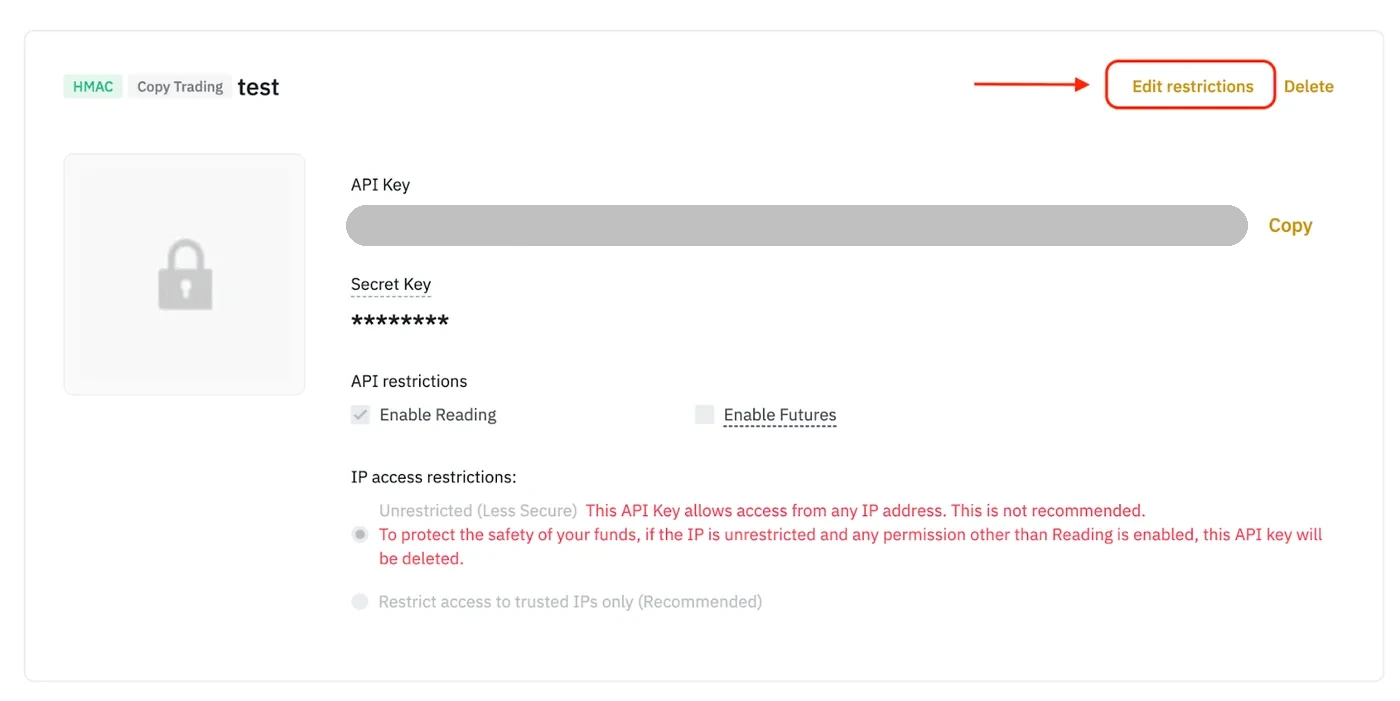
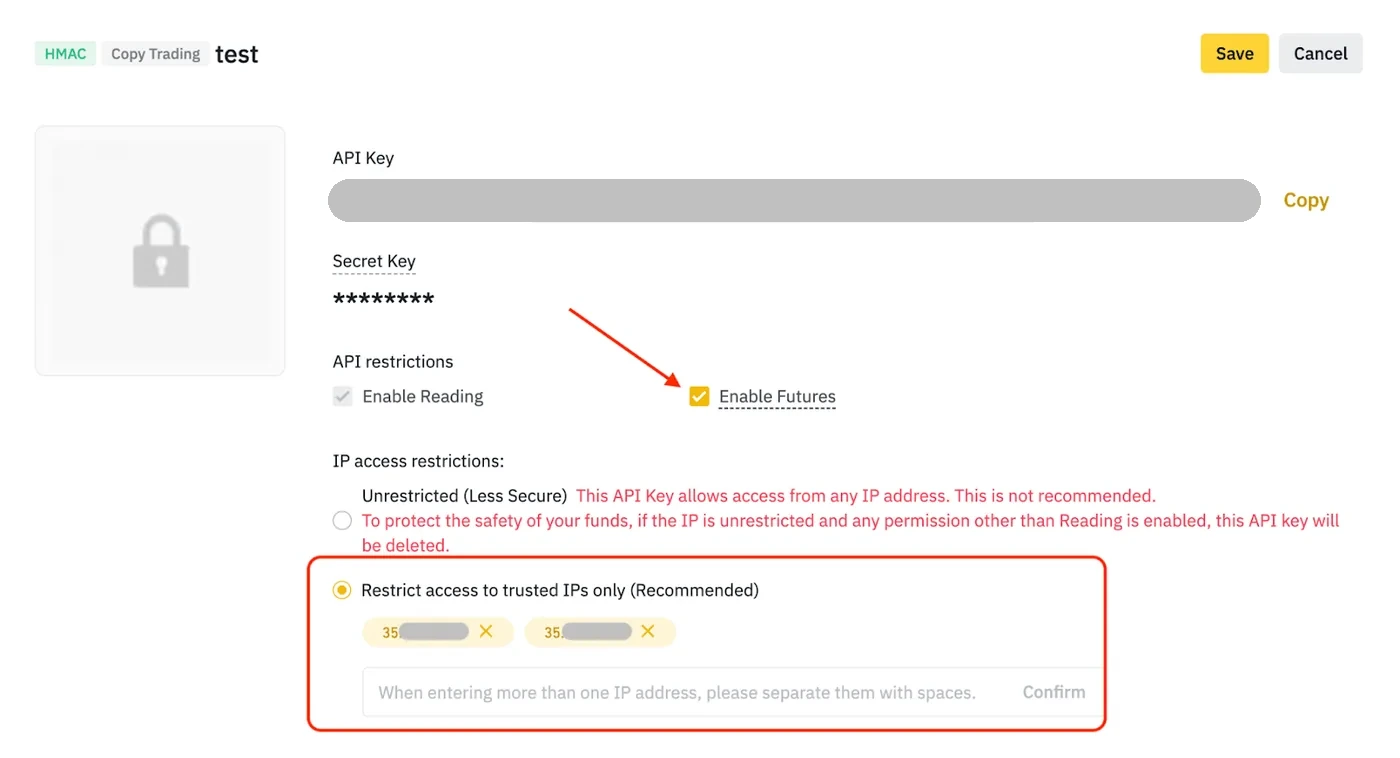
- Under IP access restrictions select Restrict access to trusted IPs only (Recommended).
- Paste the ByteBoom server IP from step 1 into the box and click Confirm. It appears as a tag under the option.
- Tick the permissions exactly as in the table below.
- Click Save and complete the security verification again.
| Permission | Set to | Why |
|---|---|---|
| Enable Reading | ON (default) | Lets ByteBoom read balances, positions and orders. |
| Enable Spot & Margin Trading | ON | Lets ByteBoom place spot trades. ByteBoom does not borrow on margin. |
| Enable Futures | ON | Lets ByteBoom open and close USDⓈ-M Futures positions. |
| Permits Universal Transfer | ON | Moves USDT between your Funding and Futures wallets to match your trading capital. Without it, rebalancing fails with Binance error -1002. |
| Enable Withdrawals | OFF | ByteBoom never withdraws. ByteBoom rejects keys that have withdrawals enabled. |
| Everything else (Margin Loan/Repay & Transfer, Internal Transfer, European Options, Symbol Whitelist) | OFF | Not used by ByteBoom. Leave them off. |
Step 6: Futures account settings ByteBoom needs
ByteBoom sets leverage and margin for each trade itself. It needs two account-wide settings on your USDⓈ-M Futures account:
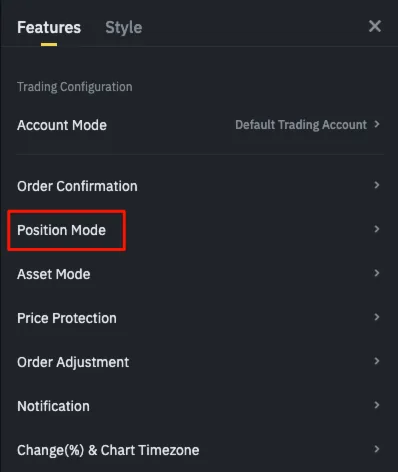
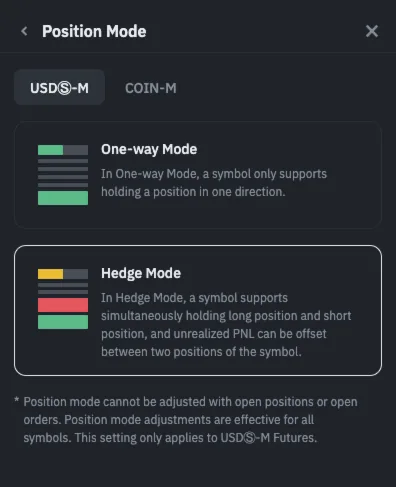
- Position Mode: One-way Mode. ByteBoom places one-way orders, so they are rejected in Hedge Mode. One-way is Binance's default.
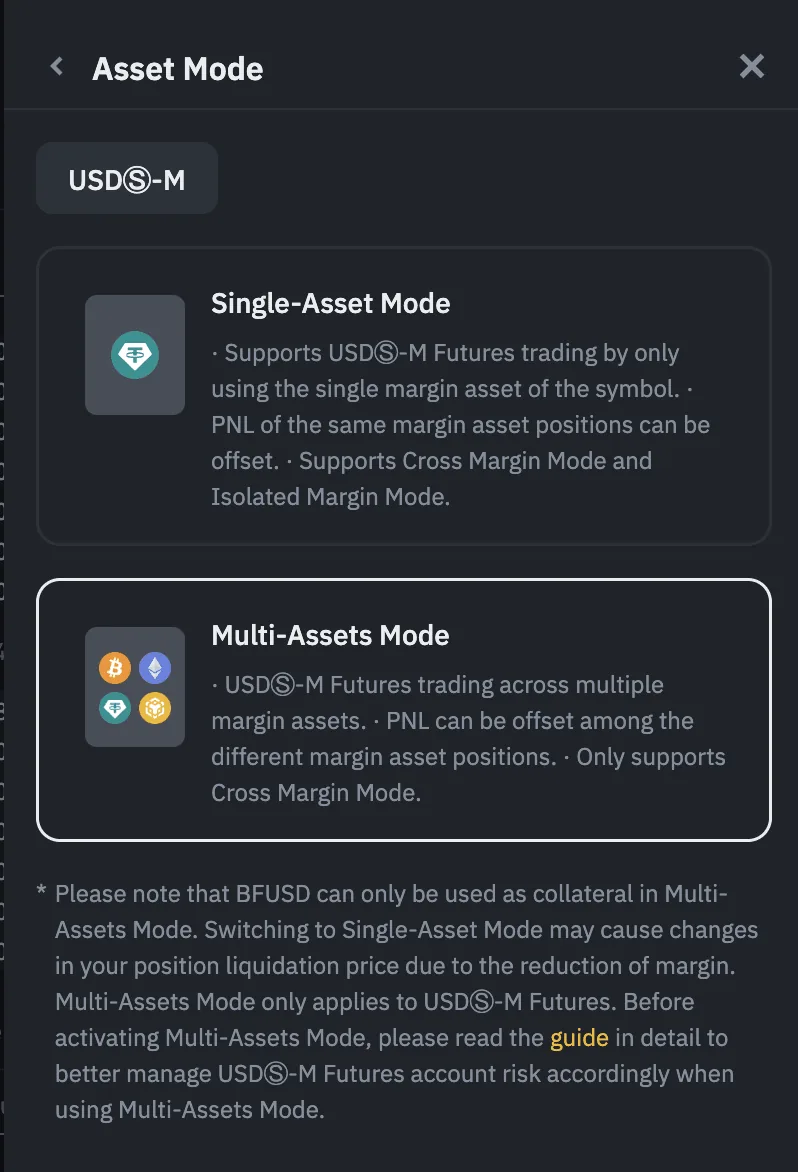
- Asset Mode: Single-Asset Mode. ByteBoom trades each position on isolated margin, and Binance doesn't allow isolated margin in Multi-Assets Mode (error
-4168). Binance switches newer Futures accounts to Multi-Assets Mode by default, so check this setting even if you never changed it.
On binance.com open Futures → USDⓈ-M Futures, then click the settings (gear) icon at the top right.
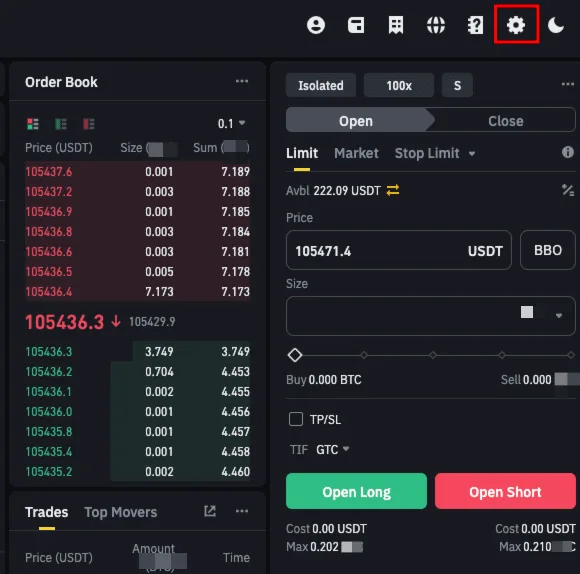
In the Features tab, open Position Mode and choose One-way Mode. Then go back, open Asset Mode and choose Single-Asset Mode.
Step 7: Paste the keys into ByteBoom
Back in ByteBoom (Settings → Connected Exchanges → Binance → Setup), paste your API Key into API Key and your Secret Key into Secret Key, then click Connect Account (or Update Connection).
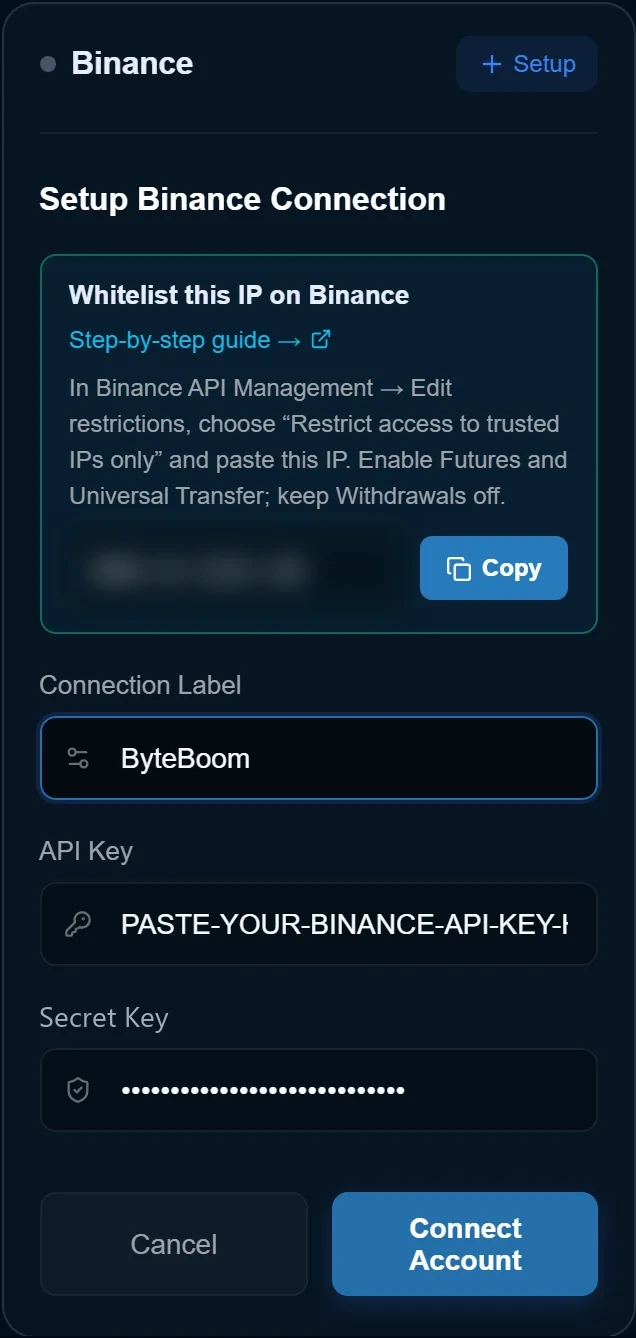
ByteBoom checks the key with Binance when you save. If it's accepted, Binance shows as Connected.
If you see a red “Your Binance API key is not working” banner
ByteBoom keeps checking your key. If Binance starts refusing it (wrong IP, a permission removed, key deleted), trading on your account is paused and the dashboard shows this banner with the reason. Fix the key on Binance (step 5), then press Re-check. Trading resumes once the check passes.

Step 8: Fund your account
- Keep USDT in your Binance USDⓈ-M Futures wallet or your Funding wallet. ByteBoom counts both.
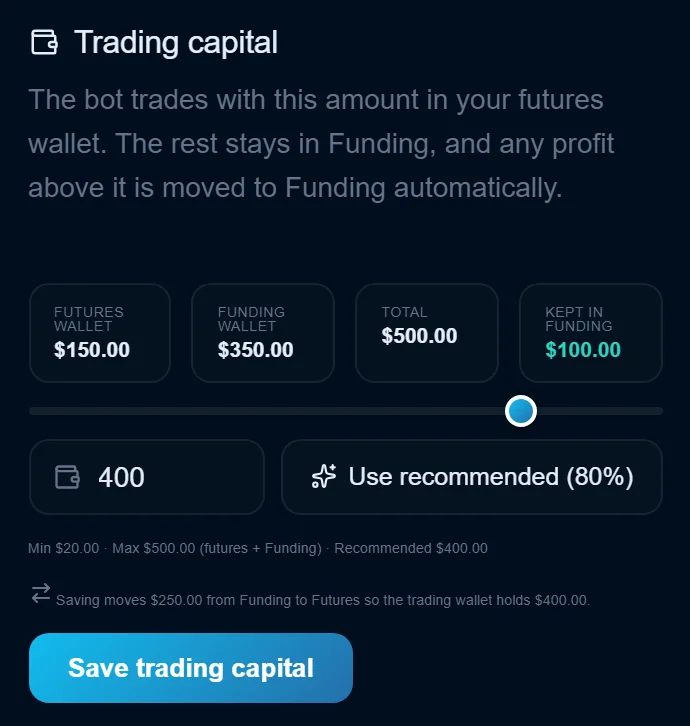
- In ByteBoom Settings → Trading capital, choose how much ByteBoom trades with (minimum $20) and save. ByteBoom moves USDT between Funding and Futures to match (this is what Universal Transfer is for).
- Trading capital is for futures. USDT in your Spot wallet is used for spot trading and isn't counted here.
Troubleshooting
| You see | What it means | Fix |
|---|---|---|
-2015 “Invalid API-key, IP, or permissions for action” or IP_RESTRICTION_ERROR when saving | Binance refused the key: typo in the key, IP not whitelisted, or a missing permission. | Check the key and secret have no spaces, the ByteBoom IP is in the trusted list, and Enable Futures is ticked. Then save again or press Re-check. |
-1002 “You are not authorized to execute this request” | Permits Universal Transfer is off, so ByteBoom can't move USDT between Funding and Futures. | Edit restrictions → tick Permits Universal Transfer → Save. |
-4168 (can't use isolated margin in Multi-Assets mode) | Your Futures account is in Multi-Assets Mode. | Futures → settings → Features → Asset Mode → Single-Asset Mode (step 6). |
| “First disable withdraw option from API management” | The key has Enable Withdrawals turned on. | Untick Enable Withdrawals, save, then connect again. |
| Key expired, disabled or deleted | Usually the key wasn't IP-restricted, or it was deleted or changed on Binance (or by a Binance security action). | Create a new System-generated key (steps 2–5) with the ByteBoom IP, then update it in ByteBoom Settings. |
| “I lost my Secret Key” | Binance shows it only once, so it can't be recovered. | Delete the key on Binance, create a new one (steps 3–5) and update it in ByteBoom. |
| Can't tick Enable Futures | No IP restriction yet, the key is older than your Futures account, or Portfolio Margin is on. | Add the ByteBoom IP first. If it's still greyed out, create a new key. |
Still stuck? Contact ByteBoom support. Include the error text but never your Secret Key.